
Generate an Image with DALL·E 2
Post by Amina Delali, June 02nd, 2023
What is DALL·E 2
DALL·E 2, an artificial intelligence (AI) system, that has the capability to generate lifelike images and artwork based on natural language descriptions.
In this post, we are going to use the DALL·E 2 API to generate images using python programming language
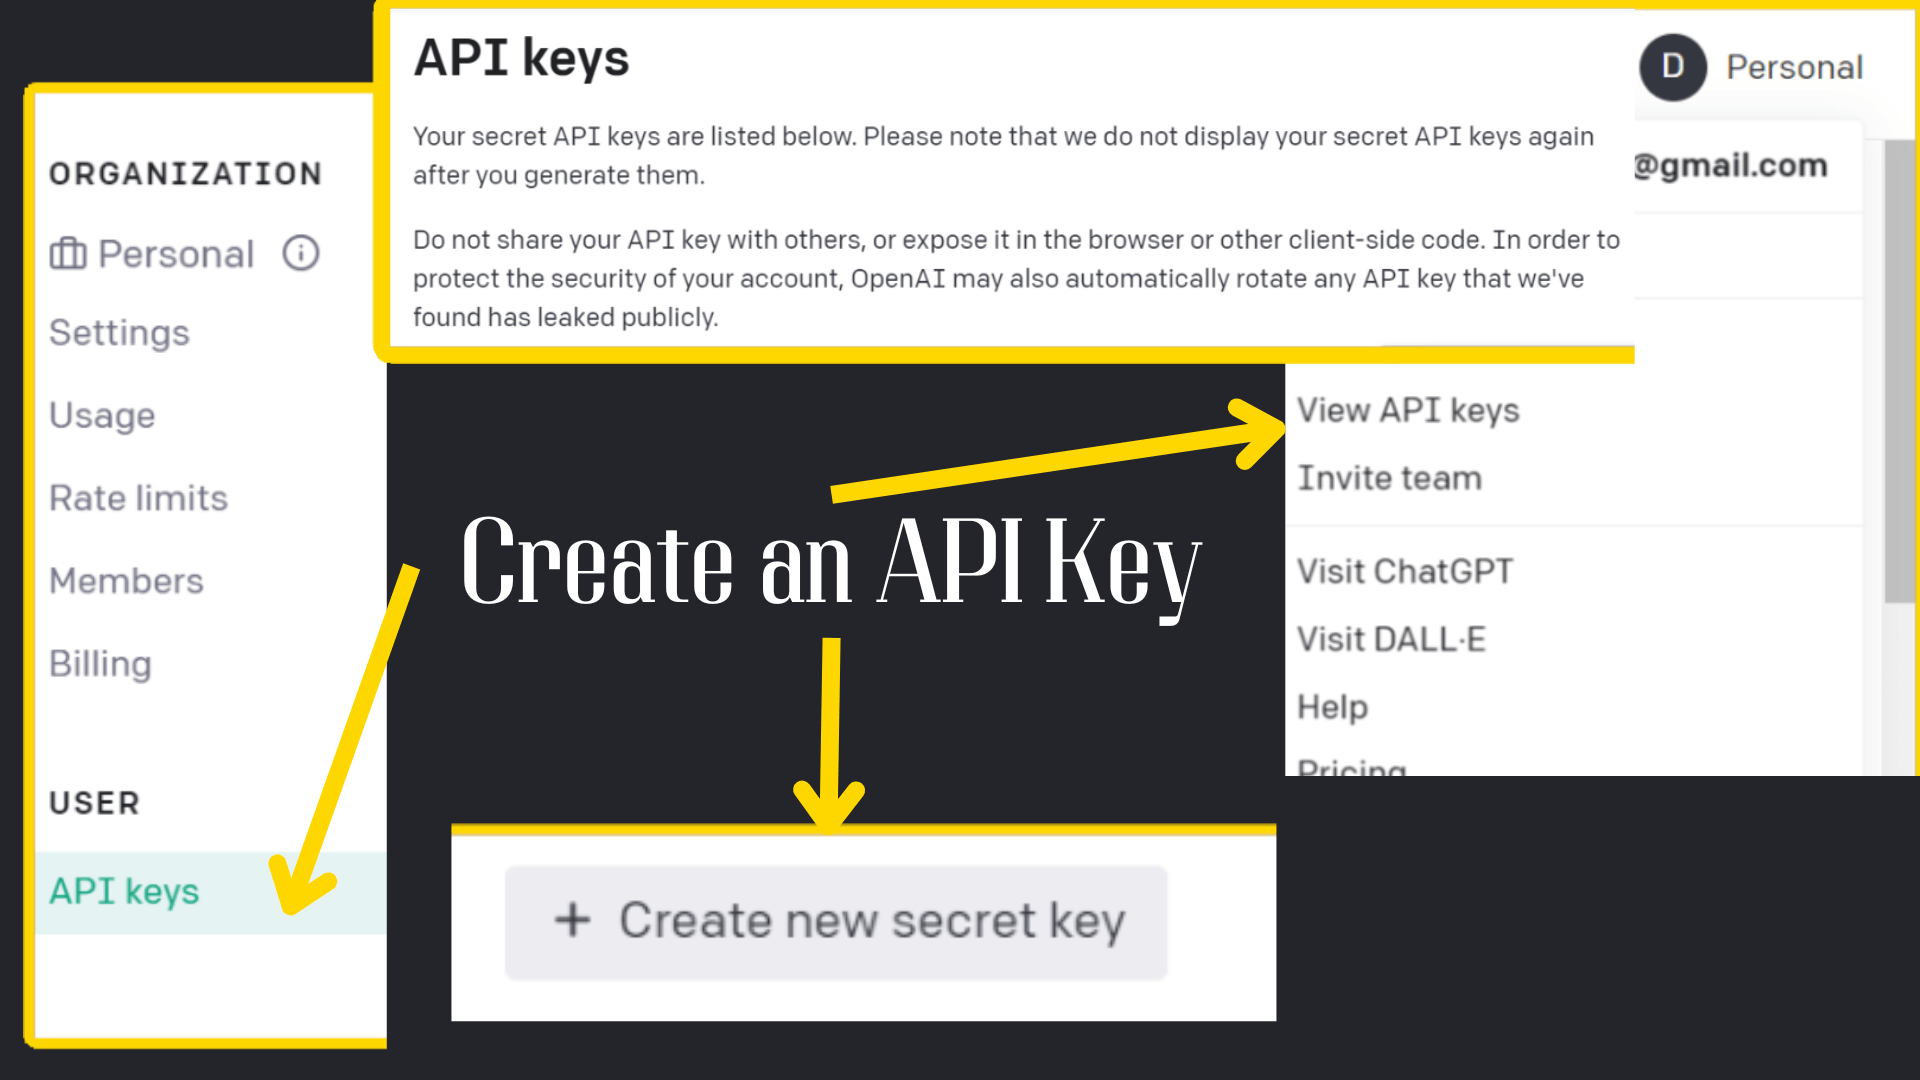
Create an API key
How to create an image with DALL·E 2 and Python
First of all, you have to install openai library. Don't worry, its very simple. All you have to do, is to open your command prompt and type in:
pip install openai
In the code, we are going to import the library (import openai), and use it to make our requests. We will request an image generation, recuperate that image, and then display it on a canvas object created on a Tkinter Window.
The steps are simple:
- set the api_key value to your own Open AI key. In the code, you replace the string "YOUR OPEN AI KEY" by your own key.
- request an image generation from DALL·E 2: we will use DALL·E 2 API to request an image generation. The mandatory parameters are:
- prompt: the text that describes the image to generate. In our case, the text will be: "A model with incredible shading and contrast, great at both photos and artistic styles, by cac0e."
- n: the number of images to generate. We will generate only one image by request (n=1)
- size: the size of the image to generate. It will also determine the cost of your request. There are 3 sizes to choose from. In our case it will be the 1024x1024 image size.

- save the returned answer to a text file, just of safety reason. In case there will be later errors in the code. You don't have to make an other requests. Just recuperate the values you need from your text file.
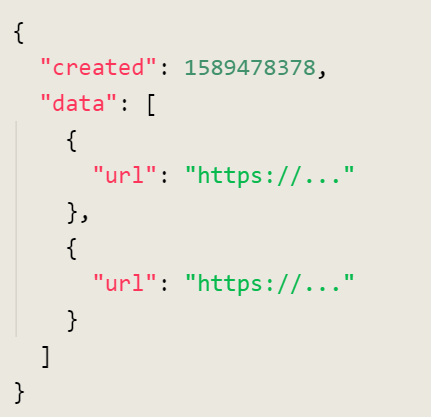
- recuperate the url from the answer. Below is the structure of the returned answer. In our case, it will be only one url value. So, the "data" list will have only one value. Since, the answer in our code is in the response variable. The URL value will be:
image_url= response["data"][0]["url"] - create an image from the recuperated url
- create a PhotoImage object corresponding to a resized image, to fit later in our display
- create the window of our application, create and add a canvas widget, attach the image to that canvas, then run the application.

The Code
import openai
from tkinter import *
from PIL import ImageTk, Image
import urllib.request
# Request an image creation From DALL·E 2
openai.api_key = "YOUR OPEN AI KEY"
response = openai.Image.create(
prompt="A model with incredible shading and contrast, great at both photos and artistic styles, by cac0e.",
n=1,
size="1024x1024"
)
# Save the entire answer in a text file for safety
with open('answer.txt', 'w') as f:
f.write(str(response))
# Recuperate the Image's url from the Returned Answer
image_url= response["data"][0]["url"]
# Recuperate the image from the URL, and save it localy into a file
file_name = "theGenImage.png"
urllib.request.urlretrieve(image_url, file_name)
# Create an image object, resize the image, then create a PhotoImage object
imageFile = Image.open(file_name)
imageFile = imageFile.resize((580,530), Image.LANCZOS)
imageFile = ImageTk.PhotoImage(imageFile)
# Create the main window of the application
main_window=Tk()
main_window.title("Python OpenAI Image Generation")
main_window.geometry('600x550+500+50')
bgColor="#24252B"
main_window.configure(bg=bgColor)
# Create a canvas object, and add to it the created image
can = Canvas(main_window, width=580, height=530,bg=bgColor)
can.image = imageFile
can.create_image(0,0, anchor=NW, image=imageFile, tags="bg_img")
can.grid(row=0,column=0,padx=10,pady=10)
# Start running the application
main_window.mainloop()
The Output
Something to say ?
If you want to add something, please feel free to do it by commenting below 🙂 .