
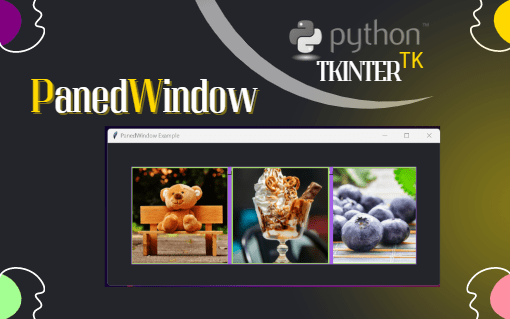
PanedWindow Example
Post by Amina Delali, July 10th, 2023
Description
The PanedWindow widget in Python's Tkinter library is used to divide the space of a frame or window into multiple sections or panes. It acts as a container for holding child widgets and allows the user to resize the panes by dragging separator lines called sashes using the mouse.
To test the widget, I wrote this code that creates a GUI window with a PanedWindow widget containing three labels with images and text. The PanedWindow allows the user to resize the child widgets by dragging the separator bars. The overall layout is structured in a grid-like fashion with padding and background colors set for various elements.
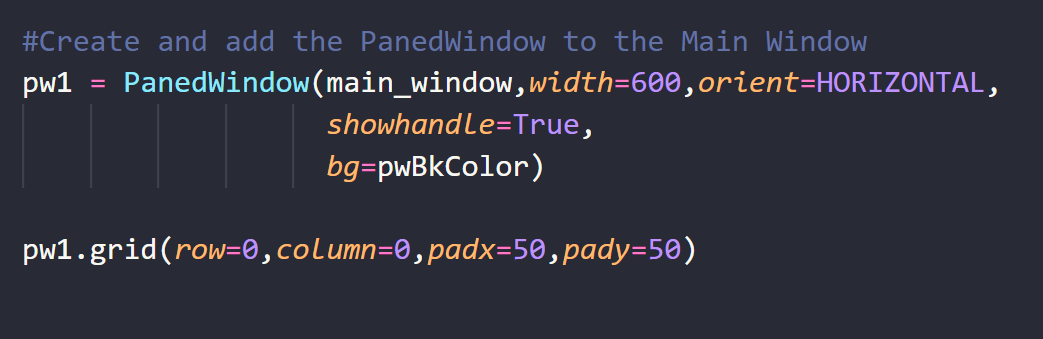
After creating the main window, a PanedWindow widget is created, and set to have a width of 600 pixels, oriented horizontally, and shows a handle for resizing. The PanedWindow is placed on the grid of the main window with horizontal and vertical padding, to allow positioning it in its center. We also defined the background color value, which is different from the one we set for the main window.
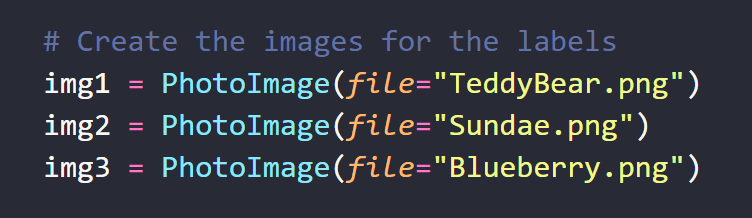
Now, we want to display and add 3 different images to our PannedWindow, to later be able to resize the images inside the widget. To add the images, we will use labels widgets, and set their "image" attributes to these images.
To set the attributes, we first create PhotoImage objects from 3 different png images. The images files must be available in the folder from were the code is run.
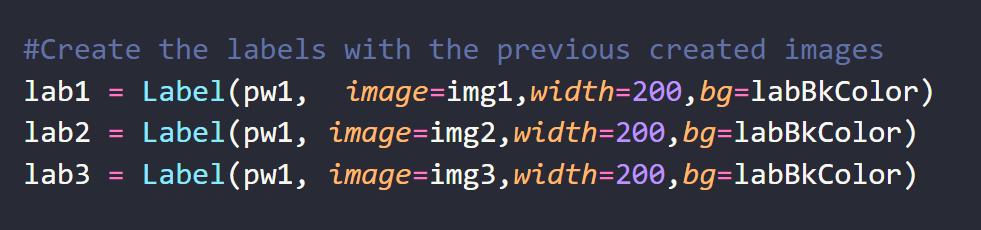
Now, we can create our labels corresponding to the 3 previous created images. We will set different attributes for the labels:
- the root, that will be our PanedWindow
- the image attribute. Each image will have the value of a PhotoImage widget created earlier.
- the width of the label.
- the background color, which is different from both the main Window, and the PanedWindow background colors.
To add our labels to the PanedWindow, we will call its add method for each of the labels. Since we set the orientation of the PanedWindow to "HORIZONTAL", the labels will be aligned horizontally, one beside the other.
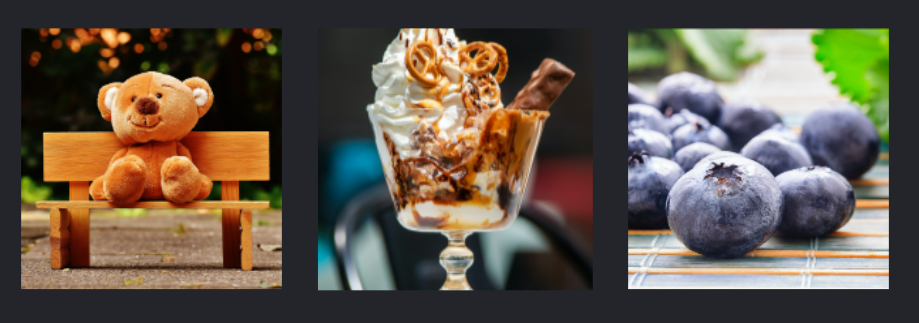
For the images, we used 200 by 200 pixel images describing a TeddyBear, a Sundae, and Blueberries. So to run the code available below, and used as it is, you have first to have 3 images with the names used in the code. Or you can simply, change the names in the code itself to correspond to the images that you have.
The Code
from tkinter import *
bkColor = "#24252B"
pwBkColor = "#A45EE5"
labBkColor= "#9FE55E"
# Create and Configure the Main Window
main_window = Tk()
main_window.geometry("700x300+200+100")
main_window.title("PanedWindow Example")
main_window.configure(background=bkColor)
#Create and add the PanedWindow to the Main Window
pw1 = PanedWindow(main_window,width=600,orient=HORIZONTAL,
showhandle=True,
bg=pwBkColor)
pw1.grid(row=0,column=0,padx=50,pady=50)
# Create the images for the labels
img1 = PhotoImage(file="TeddyBear.png")
img2 = PhotoImage(file="Sundae.png")
img3 = PhotoImage(file="Blueberry.png")
#Create the labels with the previous created images
lab1 = Label(pw1, image=img1,width=200,bg=labBkColor)
lab2 = Label(pw1, image=img2,width=200,bg=labBkColor)
lab3 = Label(pw1, image=img3,width=200,bg=labBkColor)
# Add the labels to the PanedWindow
pw1.add(lab1)
pw1.add(lab2)
pw1.add(lab3)
# Run the application
mainloop()
The Output
Something to say?
If you want to add something about this post, please feel free to do it by commenting below 🙂.